
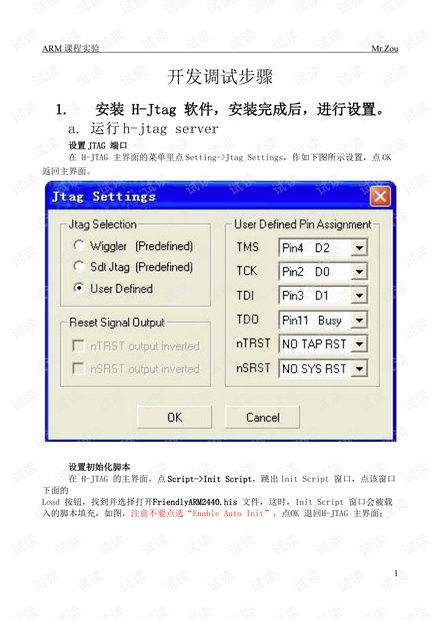
Restoring AR-3A Guide PDF: A Comprehensive Overview
Are you looking to restore your AR-3A receiver to its former glory? If so, you’ve come to the right place. The AR-3A, a classic tube radio from the 1950s, has a rich history and a loyal following. This guide will walk you through the process of restoring your AR-3A, from the initial assessment to the final touches. Whether you’re a seasoned restorer or a beginner, this guide will provide you with the knowledge and tools you need to bring your AR-3A back to life.
Understanding the AR-3A

The AR-3A was introduced by the Audio Research Corporation in 1954. It was one of the first solid-state receivers to hit the market, offering a sleek design and advanced features for its time. The AR-3A is known for its high-fidelity sound and classic appearance, making it a favorite among collectors and audiophiles alike.
Before diving into the restoration process, it’s important to understand the key components of the AR-3A. The receiver consists of a power supply, a preamplifier, and an output transformer. Each of these components plays a crucial role in the overall performance of the radio.
Assessing the Condition of Your AR-3A
The first step in restoring your AR-3A is to assess its current condition. Take a close look at the following areas:
-
Case and cabinet: Check for any cracks, dents, or missing parts. The condition of the case will determine the level of restoration required.
-
Tube sockets: Inspect the tube sockets for any signs of corrosion or damage. Corroded sockets can cause tube failure and poor performance.
-
Transformer: Look for any visible damage to the transformer, such as cracks or burn marks. A damaged transformer can affect the sound quality and safety of the receiver.
-
Capacitors and resistors: Check for any signs of discoloration or bulging, which may indicate a failure. These components are crucial for the proper functioning of the receiver.
-
Wiring: Inspect the wiring for any loose connections or damage. Damaged wiring can cause intermittent performance or even a fire hazard.
Once you’ve assessed the condition of your AR-3A, you can determine the necessary steps for restoration.
Restoring the Case and Cabinet
The case and cabinet of the AR-3A are often the first parts to show signs of wear. Here’s how to restore them:
-
Clean the case: Use a soft cloth and mild detergent to clean the case. Avoid using harsh chemicals or abrasive materials, as they can damage the finish.
-
Touch up paint: If the case has any chips or scratches, touch them up with a matching paint color. Be sure to sand the area lightly before applying the paint.
-
Replace missing parts: If the case is missing any parts, such as knobs or grill cloth, you can find replacements online or at a local hobby store.
For more extensive damage, you may need to sand and repaint the case. This process requires patience and attention to detail, but it can restore your AR-3A to its original appearance.
Restoring the Tube Sockets
Tube sockets are crucial for the proper functioning of the AR-3A. Here’s how to restore them:
-
Remove the old sockets: Use a screwdriver to remove the old tube sockets from the receiver.
-
Clean the sockets: Use a wire brush to clean the inside of the sockets. This will remove any corrosion or debris that may be causing tube failure.
-
Install new sockets: Purchase new tube sockets and install them into the receiver. Be sure to follow the manufacturer’s instructions for proper installation.
Replacing the tube sockets is a relatively simple process, but it’s crucial for the long-term health of your AR-3A.
Restoring the Transformer
The transformer is a critical component of the AR-3A, and it’s important to ensure it’s in good condition. Here’s how to restore the transformer:
-
Inspect the transformer: Look